How to Replace an RV Roof Vent Cover
Disclosure: This article contains affiliate links. If you buy through these links, we may earn a commission at no extra cost to you. We do not claim hands-on testing unless clearly stated.
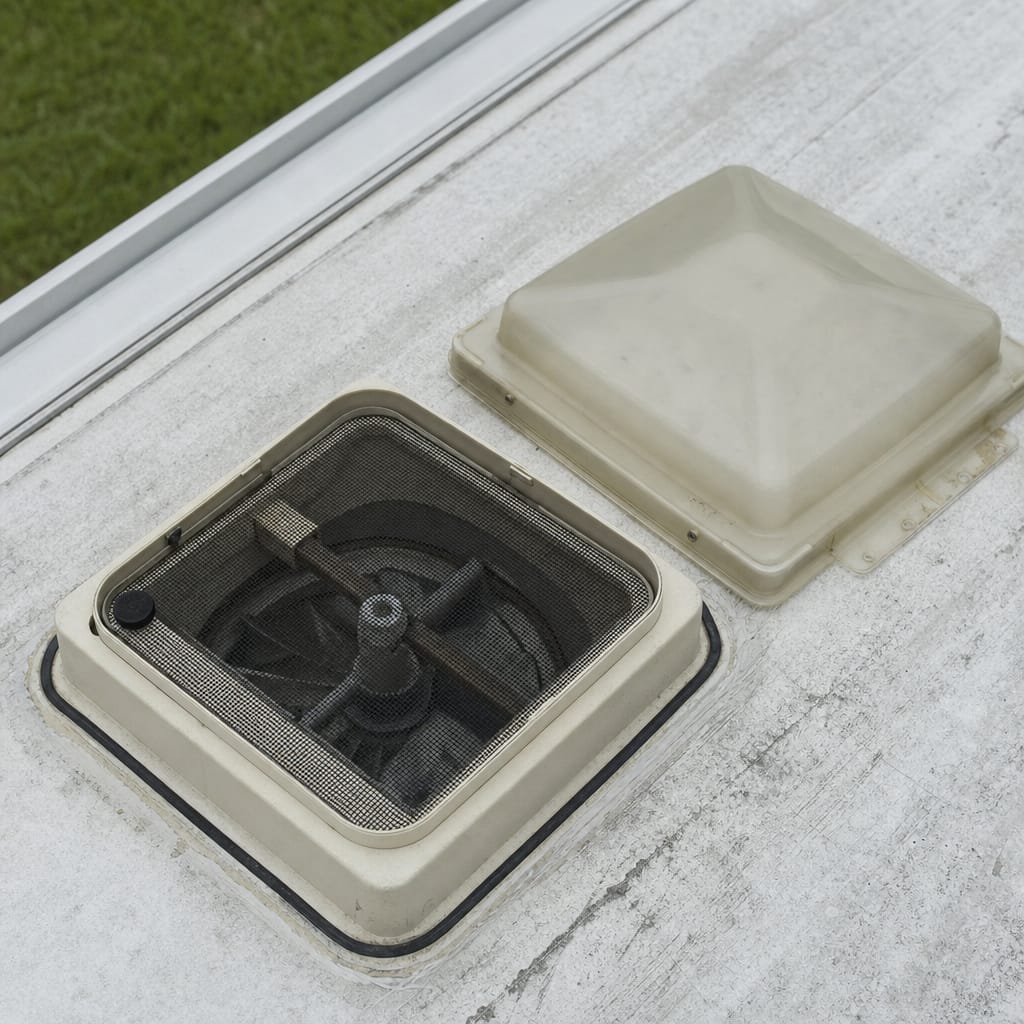
A cracked or missing plastic vent lid is one of the most common RV roof failures — cheap to fix, but only if the replacement actually fits. This guide covers confirming your vent's size and base type before ordering, removing the old lid, resealing the new one, and what to watch for if your vent is a non-standard type.
It doesn't cover replacing a powered vent fan or AC shroud — a different product and guide — or repairing a cracked base or torn hinge rail, a bigger job than a lid swap; see "Skip It If" below.
What It Has to Do
A vent lid keeps rain out while the base's screened opening does the actual venting — letting moisture and odor escape from the bathroom or galley below. The lid isn't structural and doesn't seal the roof membrane itself; that's the lap sealant's job, applied separately at the screw holes and lap edge.
Lids fail mostly from UV exposure: years of sun make the plastic brittle enough to crack or shatter, normal wear rather than a manufacturing defect.
Looking to cover the whole RV instead of just a roof vent? See shopping for a full RV cover — a different product.
Before You Order: Confirm Your Vent's Size and Base Type
Before you order a replacement lid, get on the roof (see safety notes under "What You'll Need") and check three things: the exact opening size, whether the existing lid attaches with visible hinge-rail hardware or sits as a flush screw-down cover, and any brand name or model stamp on the base itself. You don't need to remove anything yet — this is an inspection pass.
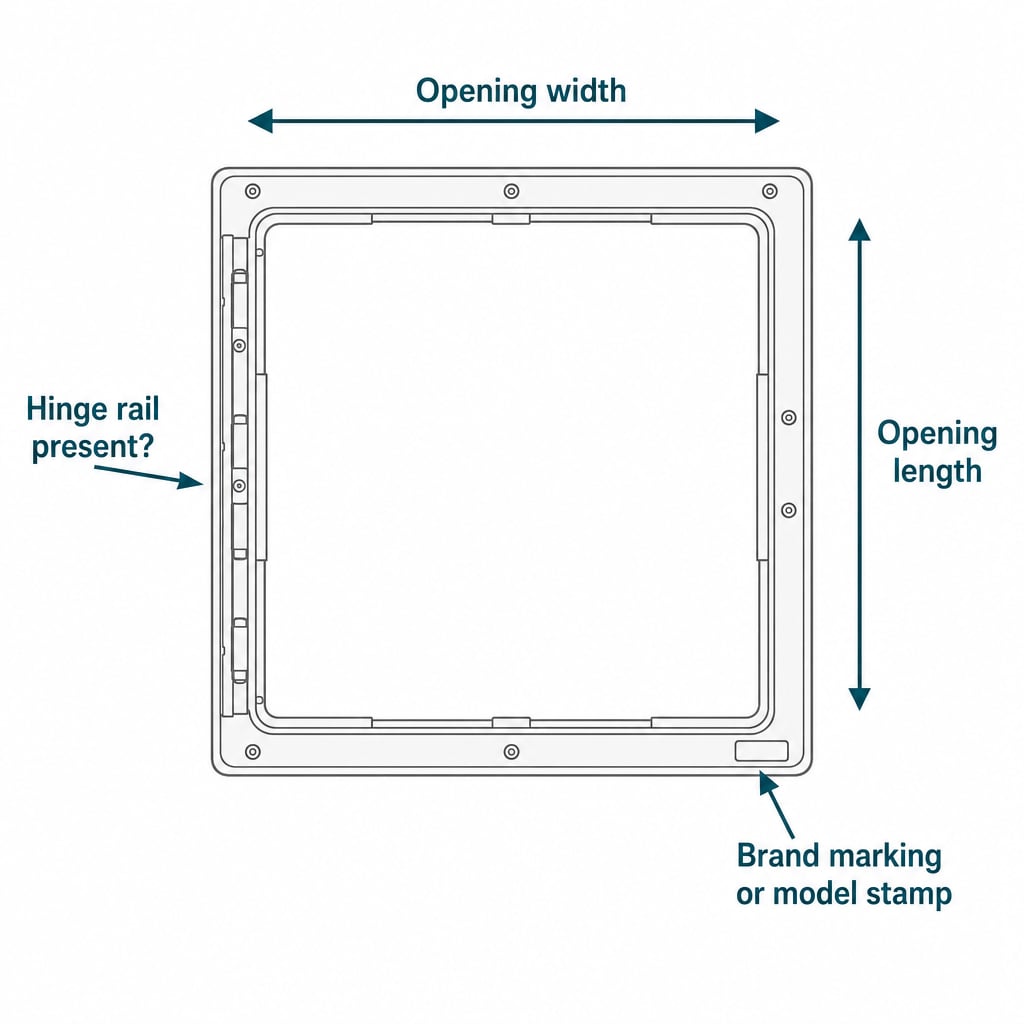
"14 inch" shows up on nearly every listing here, but it doesn't always mean the same thing — sometimes it's the roof opening, sometimes the lid's own outer footprint, and the two aren't interchangeable. A listing worth trusting states the opening size, the lid's outer dimensions, and the mount/hinge style as three separate figures — not one headline number. The table below does that for the families we could source, leaving a cell blank wherever the source didn't publish a number, rather than guessing.
| Vent lid family | Nominal opening size | Lid outer dimensions as published | Mount / hinge style | Source |
|---|---|---|---|---|
| Standard 14×14 dome cover (Camco 40433) | 14 in × 14 in (existing opening) | — | Non-hinged, screw-mounted over the existing frame | RV Upgrade Store, Camco 40433 listing (dealer) |
| Ventline pre-2008 (V2094) / Elixir 1994-up rounded-dome family | 14-1/4 in × 14-1/4 in | 15 in × 15 in | Continuous metal hinge, rounded dome | Hanna Trailer Supply, Ventline (by Dexter) BV0554-01 listing (dealer) |
| Ventline Ventadome 2008-present wedge family (V2092/V2094/V2110/V2119) | 14-1/4 in × 14-1/4 in rough opening | 14-1/4 in × 14-1/4 in | Jensen-style hinge, wedge shape, radius corners | RV Adenver, Ventline BVD0449-A01 listing (dealer) |
| Camco 40155 — aftermarket lid, same Ventline/Elixir family above | — | — | Replacement lid; hinge type not stated | Camco Outdoors, SKU 40155 product page (manufacturer) |
| Heng's 90114-C1 / 7-Series universal metal lid | — | — | Metal lid; manufacturer states interchangeable with Elixir/Ventline, no generation cutoff given | Heng's Industries, vents category page (manufacturer) |
Even manufacturer-quoted numbers don't always agree: dealer pages quoting Camco's 40433 listing give two different outer dimensions for the same SKU, and neither corrects the other — why that cell is blank instead of picking one. Measure your own opening and lid rather than trust a single reseller's number.
For more replacement options than the three covered here, see our full roundup of RV roof vent cover options.
What You'll Need
- A replacement lid matched to your vent's base type (see the table above)
- Screwdriver or drill
- Putty knife or plastic scraper
- Butyl tape and screws, or an installation kit bundling both
- Lap sealant
Working at height: use a rated ladder, work in dry weather, and have someone around who knows you're up there.
Replacing the Lid, Step by Step
Do the steps in order. Skipping ahead — especially the dry-fit in Step 4 — is where most of the mistakes below come from.
Step 1 — Assess What's Actually Damaged
A lid that's cracked, yellowed, or missing but still seated on an intact base and hinge rail is what this guide covers. A cracked or warped base, or a hinge rail pulled loose, is a bigger repair — see "Skip It If" below.
Step 2 — Remove the Old Lid
Unscrew the hinge-side screws (or the frame's mounting screws, if unhinged), then work a putty knife or plastic scraper under the old sealant and butyl tape at the lap edge to free it. Lift the lid — and hinge assembly, if it has one — off the base.
Step 3 — Clean the Base and Screw Holes
Scrape off old sealant and butyl residue so the new lid sits flat — a lid resting on old ridges won't seal evenly regardless of the new sealant. Note any stripped or enlarged screw holes before reinstalling.
Step 4 — Confirm Fit Before You Commit Sealant
Set the new lid on the cleaned base and check it seats flat and the hinge or mounting holes line up, before opening any tape or sealant. This costs a few minutes; a mismatch found after the tape is down costs a return trip and a mess.
Step 5 — Set the New Lid with Butyl Tape and Screws
Lay the butyl tape around the frame per the manufacturer's instructions, then seat the lid and drive the included screws.
Camco RV Roof Vent Cover, White (40433) — the direct-replacement lid for a standard 14"×14" opening, hinged to open for cleaning.
Camco 25013 Universal Vent Installation Kit — bundles the screws and butyl tape (3/4" × 8') in one kit.
One caveat: Camco scopes this kit to rubber (EPDM) roofs. A TPO or fiberglass roof needs a different tape and sealant system.
Step 6 — Seal the Screw Heads and Lap Edge
Run lap sealant over each screw head and along the lap edge where the lid meets the roof.
Dicor 501LSW-1 EPDM Self-Leveling Lap Sealant — self-leveling, so it settles flat on a horizontal surface instead of running off the way a non-sag (vertical-rated) sealant would.
Follow the cure schedule printed on the tube rather than assuming it's ready once it skins over. The manufacturer's page also warns to keep it away from heat, sparks, and open flame, and to work with ventilation — worth taking seriously on an outdoor roof in direct sun.
Tools and Products That Help
The three products above already appear inline in the steps — this is a quick recap.
- Replacement lid — Camco 40433, for a standard 14"×14" opening. Confirm that's your opening size before ordering.
- Installation kit — Camco 25013, screws and butyl tape sized for this job, scoped to EPDM/rubber roofs.
- Lap sealant — Dicor 501LSW-1, self-leveling, for horizontal roof surfaces only.
None of these is a universal fit. If your vent turns out to be a Ventline, Elixir, or other non-standard base per the table above, the lid here won't be the right part — the kit and sealant still apply regardless of which lid you end up ordering.
Common Mistakes
The crack you're fixing came from ordinary UV exposure over years outdoors — see how covers hold up over a winter season to slow that wear down.
Ordering by "14 inch" alone. The same "14 inch" covers different actual footprints depending on whether it's the opening or the lid's outer size — check both against the listing before ordering, not just the headline number.
Using an EPDM-scoped sealant kit on a TPO or fiberglass roof. Camco 25013 is scoped to rubber roofs; a different roof material needs a different tape and sealant system. Confirm roof material first — see "Skip It If" below.
Skipping the dry-fit. Laying butyl tape before confirming the new lid seats on the cleaned base means a mismatch after the tape is down costs removal on top of a return order. Dry-fit first, every time (Step 4 above).
Skip It If
- The vent base or frame is cracked, warped, or the hinge rail has torn loose from the roof — a bigger repair than a lid swap, and this guide doesn't cover it.
- Your roof isn't EPDM/rubber. This guide's tape and sealant system is scoped to that material — a TPO or fiberglass roof needs a different product. See sealing an RV AC unit for the same trade-off elsewhere on the rig.
- You can't confirm your existing lid's outer dimensions or find any brand marking on the base at all. Measure and identify first — don't guess from a photo or a forum post.
RV roof vent lid sizes by family
Vent lid listings describe themselves as "14 inch" or "universal" without saying whether that number is the roof opening or the lid's own outer footprint, and without saying which hinge style or vent generation the lid is built for. This table separates those three things — the opening size, the lid's own outer dimensions, and the mount/hinge style — for the vent-lid families most commonly sold as replacements, with one source per figure and a blank left wherever the cited source does not publish that number.
| Vent lid family | Nominal opening size | Lid outer dimensions as published | Mount / hinge style | Source | Source checked |
|---|---|---|---|---|---|
| Standard 14×14 aftermarket dome cover (Camco 40433, screws over an existing vent frame — not a hinge-rail replacement lid) | 14 in x 14 in (existing roof vent opening the cover mounts over) | Non-hinged cover, permanently screw-mounted over the existing vent lid/frame through base flanges; not a hinge-rail replacement lid | RV Upgrade Store, Camco 40433 product listing (dealer) | 2026-09-20 | |
| Ventline pre-2008 (V2094) / Elixir 1994-and-up rounded-dome family — OEM hinge-rail replacement lid | 14-1/4 in x 14-1/4 in | 15 in x 15 in | Continuous metal hinge, rounded dome shape, hinge-rail replacement lid | Hanna Trailer Supply, Ventline (by Dexter) BV0554-01 listing (dealer) | 2026-09-20 |
| Ventline Ventadome 2008-to-present wedge-shape family (V2092 / V2094 / V2110 / V2119) — OEM replacement lid | 14-1/4 in x 14-1/4 in rough opening | 14-1/4 in x 14-1/4 in | Jensen-style hinge, wedge shape with radius corners, polypropylene | RV Adenver, Ventline BVD0449-A01 Ventadome vent lid listing (dealer) | 2026-09-20 |
| Camco 40155 — aftermarket lid keyed to the same Ventline pre-'08 / Elixir '94-up family as the row above (independent second manufacturer naming the same generation split) | Replacement lid (white); page does not describe hinge type | Camco Outdoors, product page for SKU 40155 (manufacturer) | 2026-09-20 | ||
| Heng's 90114-C1 / 7-Series universal metal lid — marketed as cross-compatible with Elixir and Ventline bases | Metal lid, standard mount; manufacturer states interchangeable with Elixir and Ventline hardware but does not itemize a generation cutoff | Heng's Industries, vents product category page (manufacturer) | 2026-09-20 |
How these numbers were produced: Every figure is quoted from the cited source and never derived, estimated, or averaged across conflicting sources. 'Nominal opening size' is the roof cutout the vent base sits in; 'lid outer dimensions' is the footprint of the replacement lid itself once installed — these are two different numbers and a source that gives only one of them leaves the other blank rather than assuming they match. Where two independently sourced pages state different lid outer dimensions for the same product, neither is picked as correct: the cell is left blank and both figures are named in the caveats.
- A blank cell means the cited source does not publish that figure, or that two sources disagreed and neither could be confirmed against the other. No cell on this table is filled with a figure estimated, averaged, or carried over from a similar product.
- Camco's 40433 replacement cover: dealer pages that quote Camco's own listing state the outer dimensions as 19-5/16" L x 19" W x 8-11/16" H (rvupgradestore.com, and matched independently by mccoys.com and dbsupply.com). A separate dealer page (camperid.com) states 18.5" x 18" x 8.5" for the same SKU. The two figures do not round to each other and neither source corrects or references the other, so this table leaves the outer-dimension cell blank rather than choosing one. Measure your own lid or opening rather than ordering against either number.
- Heng's 90114-C1 is described on the manufacturer's own site as fitting Elixir and Ventline vents interchangeably and fitting "all rough openings," but that page does not publish an outer dimension, a rough-opening dimension in inches, or a stated cutoff year for which Ventline/Elixir generation it fits — at the time this was checked the page was itself marked incomplete ("Coming Soon"). A manufacturer's compatibility claim is not the same as a published dimension; treat "universal" as a hinge/mount compatibility claim, not a size guarantee, until a specific dimension is confirmed.
- This table covers lid size and mount/hinge style only. It does not cover roof membrane material (EPDM/rubber vs. TPO/fiberglass), which governs which tape or sealant to use during installation, not which lid fits — that is a separate question from the ones this table answers.
- None of this replaces measuring the reader's own vent opening and inspecting the existing lid's mount style (screw-down cover vs. hinge-rail replacement) before ordering. Vent bases are not universal across brands or model years even where a listing says so.
Download the data (CSV) · last updated 2026-09-20 · version 1.0 · CC BY 4.0, attribution to RV Field Manual.
FAQ
What size is a standard RV roof vent cover?
There isn't one universal size. "14 inch" can mean the opening or the lid's own outer footprint, and hinge-rail lids from different brands measure differently again — check the sizing section above before ordering. Dealing with a cracked skylight instead? See our guide to replacing an RV skylight cover.
Can I replace just the lid without replacing the whole vent base?
Yes, if the base and frame are intact. A cracked, warped base or a torn-loose hinge rail is a different repair — see "Skip It If" above.
What sealant should I use around an RV roof vent?
A self-leveling sealant rated for horizontal surfaces, matched to your roof material — EPDM/rubber and TPO/fiberglass need different systems.
Why do RV vent lids crack in the first place?
Years of UV exposure make the plastic brittle enough to crack or shatter — normal wear, not bad installation.
Do I need butyl tape if I'm already using lap sealant?
Yes — different jobs. Butyl tape is the mechanical seal between lid and frame; lap sealant covers the screw heads and lap edge after. Skipping either leaves a real gap.
Sources Reviewed
For vent-lid sizing: dealer listings for Camco's 40433 cover (RV Upgrade Store), the Ventline pre-2008/Elixir family (Hanna Trailer Supply), and the Ventline Ventadome 2008-and-later family (RV Adenver), plus manufacturer pages for the Camco 40155 lid (Camco Outdoors) and the Heng's 90114-C1 (Heng's Industries). For the sealant, Dicor's own manufacturer page. Once you're done on the roof, see winterizing an RV for the next seasonal task in the same area.
Related Guides
- RV Roof Vent Cover Roundup
- RV Roof Vent Cover Options
- RV AC Unit Covers
- Replacing an RV Skylight Cover
- RV Covers for Winter Storage
- RV Cover Buying Guide